A Multimedia Designer and absolute Photoshop pro. I can help you create logos that build brand value, websites (UX and UIs) that attract eyeballs and get them hooked, flyers, brochures and other direct marketing material that bring in sales, stunning app interfaces, compelling advertisements, and much more. Contact at: amitc@dzinemojo.com, arena.amit1987@gmail.com or +91-9953-815-415
Saturday, January 7, 2012
Friday, January 6, 2012
Photography @ Humayun Tomb, New Delhi, India
Humayun Tomb, New Delhi, India
Humayun died in 1556, and his widow Hamida Banu Begam, also known as Haji Begam, commenced the construction of his tomb in 1569, fourteen years after his death. It is the first distinct example of proper Mughal style, which was inspired by Persian architecture. It is well known that Humayun picked up the principles of Persian architecture during his exile, and he himself is likely to have planned the tomb, although there is no record to that effect. The tomb was constructed at a cost of 15 lakh rupees (1.5 million).
Mirak Mirza Ghiyath, a Persian, was the architect employed by Haji Begam for this tomb.
Photography Tip for White Balance in DSLR
How to use White Balance in DSLR
Never set the White Balance on a digital camera to 'Automatic'. The colour balance will change according to the subject matter and results will be inconsistent. Look at the weather and set the White Balance accordingly, such as Sun, Cloud, Shade.
Wednesday, January 4, 2012
Photography Tip About Flash
There is probably no type of photography that is more disappointing to the beginner than flash photography. This section explains some of the mysteries of flash and simplifies its usage.
Night Photography Tip
When that big light in the sky goes down at dusk, photographers have to rely on other light sources to obtain their images. This is the world of slow shutter speeds, artificial light and a different way of seeing things.
Using Color Balance in Photoshop
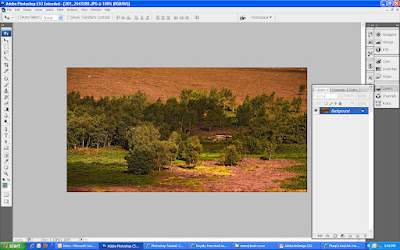 01. Take a picture and open it in Photoshop. Please respect copyright laws.
********************************************
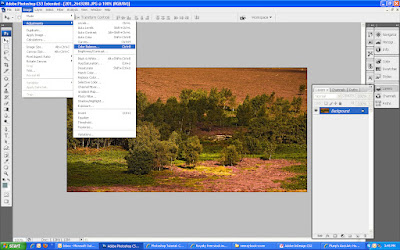 02. Go to Image > Adjustments > Color Balance.
********************************************
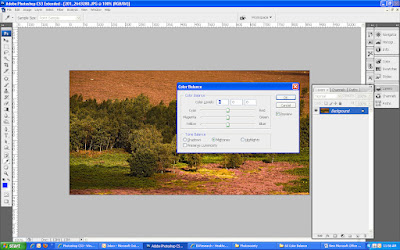 03. On doing so, a Color Balance window will open. In this window, You can adjust the three colors Cyan, Magenta and Yellow using their corresponding sliders as seen in the screenshot. Or you can also adjust these colors by typing in their levels using from the keyboard. The value of each color level can range from ‑100 to +100.
********************************************
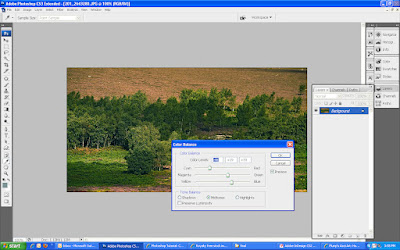 04. With practice, you can train your eye to guage which clor is over- or underused in the picture and can then compensate for or reduce that color in the picture as explained in Step 3. In this tutorial, color red has been overused in the picture and we’ve used the slider control to undo this error.
********************************************
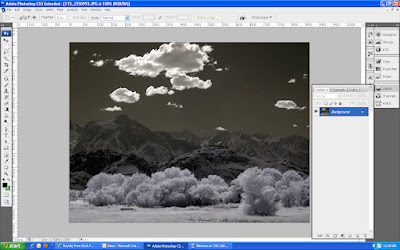 05. Now, take another black and white picture and open it in Photoshop. Please respect copyright laws.
********************************************
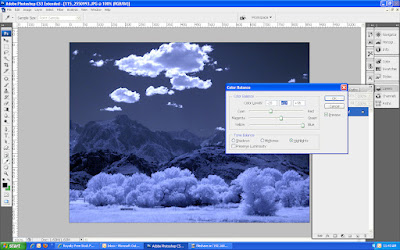 06. Open the Color Balance window again as explained in Step 2, select the Highlights radio button this time before adjusting the color
 settings. Now, you will find only the highlighted parts in the photo getting colored.********************************************
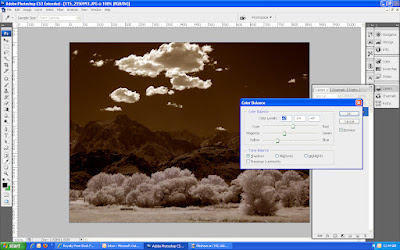 07. Select the Shadows radio Button and adjust the
 color settings. You will see only the darker parts in the picture getting colored.
********************************************
Subscribe to:
Posts (Atom)


